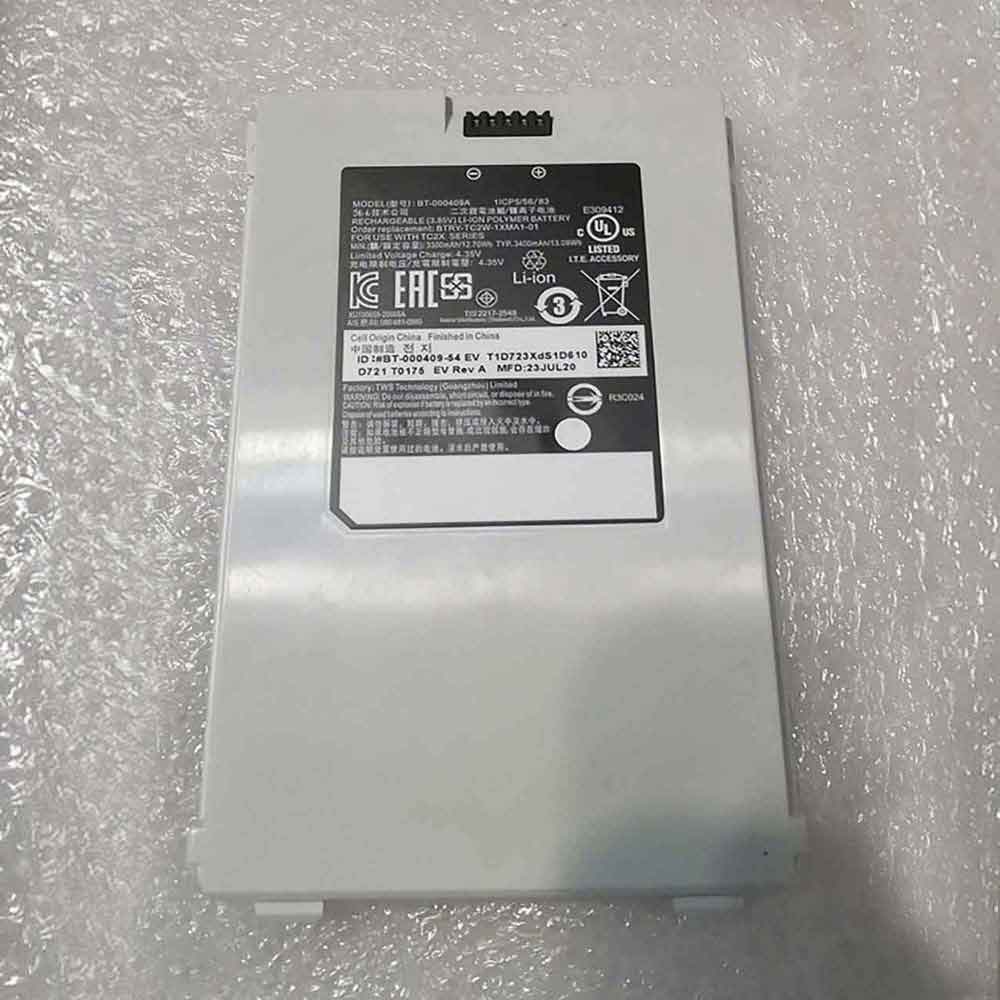
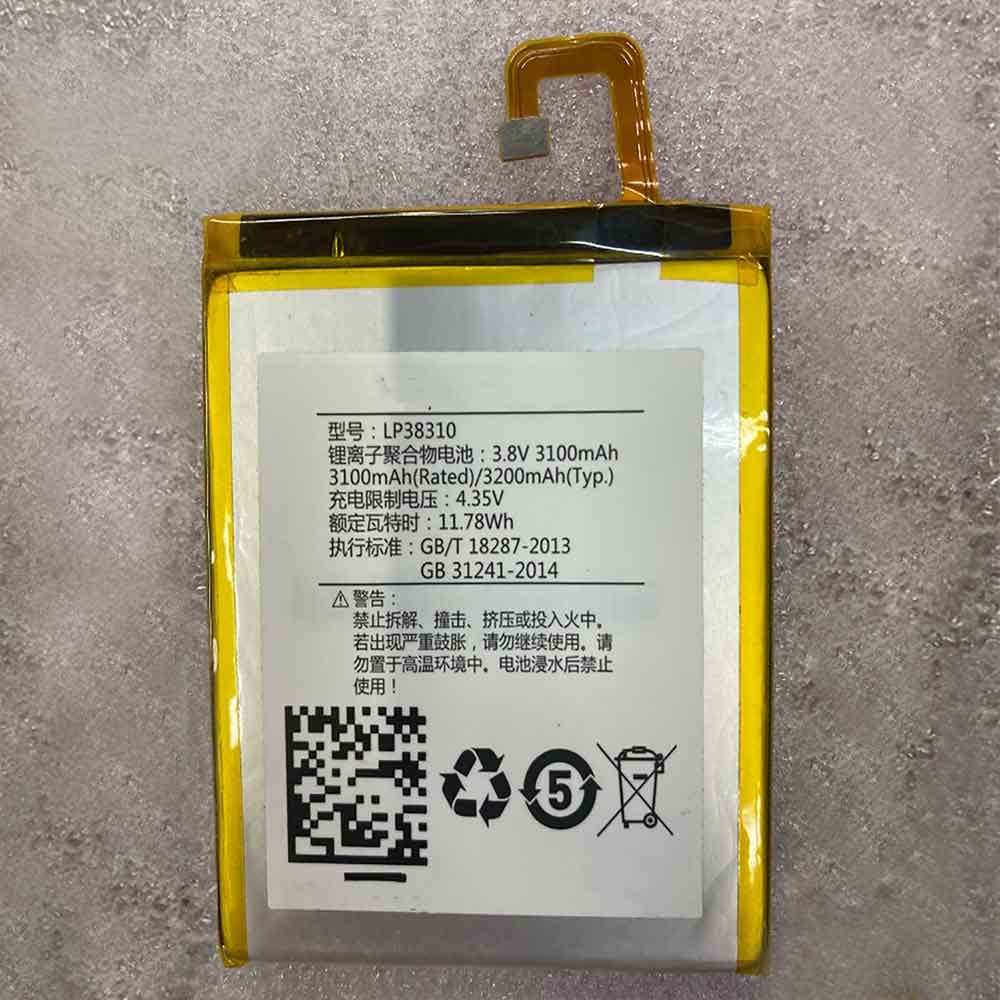
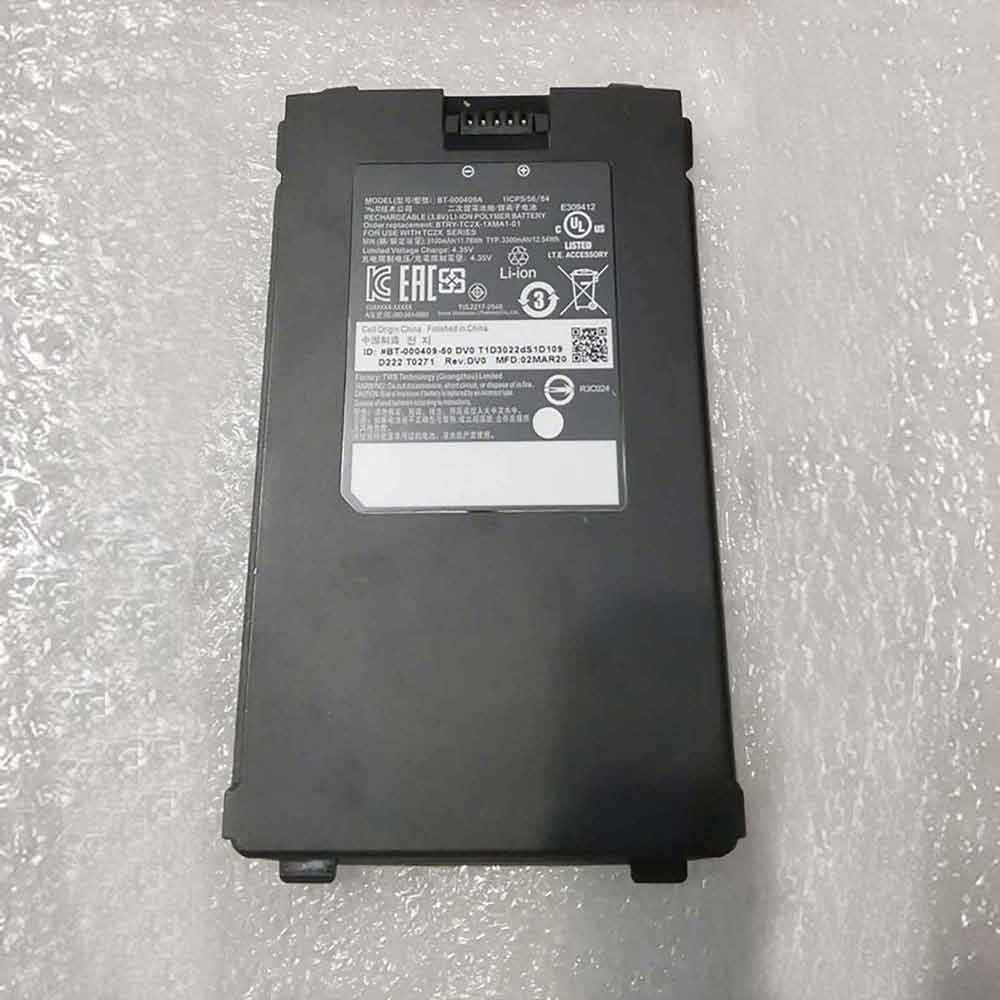
Apple Unveils the AirPods Pro for Audiophiles

Apple has unveiled the AirPods Pro, the latest addition to its AirPods range. The AirPods Pro are aimed at audiophiles who don’t mind paying a little more for headphones. And they are, on paper at least, better in every way than the standard AirPods.

image

In December 2016, Apple started selling the AirPods. And despite their odd design, the AirPods have been a huge hit. Helped by Apple’s decision to ditch the headphone jack. Now, Apple is releasing a new and improved version called the AirPods Pro.

What Are the Apple AirPods Pro?

According to the Apple Newsroom, the AirPods Pro offer “Active Noise Cancellation and superior, immersive sound in an all-new lightweight, in-ear design.” In other words, these are AirPods for people who don’t think the originals are quite good enough.

In terms of the design, the obvious change is the addition of silicone ear tips. The AirPods Pro come with three different sizes of tips, allowing you to choose the ones which are the best fit for your ears. And these tips are crucial for the Active Noise Cancellation.

The Active Noise Cancellation uses microphones and software to constantly adapt to each ear. The result being that background noise is removed. However, a Transparency mode allows you to listen to what’s going on around you while still listening to music.

Apple claims that the AirPods Pro deliver superior sound quality thanks to Adaptive EQ. This “automatically tunes the low- and mid-frequencies of the music to the shape of an individual’s ear — resulting in a rich, immersive listening experience.”

Where to Buy Apple AirPods Pro

The AirPods Pro are priced at $249 in the US and also available in 25 other countries. You can purchase the AirPods Pro on Apple.com or from the Apple Store app. The AirPods Pro will start shipping on October 30, and be available in stores next week.

If you already own a pair of AirPods you should check out our list of Apple AirPods tips for maximum enjoyment. However, if you’re not a fan of the way they look or sound, here are the best AirPods alternatives for Android and iOS.

Welcom to batteriestore.co.uk!We are a manufacturer representative and wholesaler that specializes in Laptop Batteries and Laptop AC Adapters . We have tested Batteries from virtually every manufacturer on the market. Our commitment is to provide our customers with the price/performance available on the market.

Please read the product details carefully to ensure that the brand, model and compatibility of the laptop battery you purchased meets your needs. If you need help, please contact us. Email: info@batteriestore.co.uk.

5 Warning Signs Your Mac Has a Problem (And What to Do About Them)

Your Mac is not immune to problems. Occasionally, issues crop up in either macOS or your computer components. They can gradually worsen over time, or occur suddenly.

Sometimes your Mac will give a warning sign before these become major issues. It’s up to you to take notice and keep a close watch on the system. We’ll show you some common warning signs and discuss how to fix these problems.

1. Mac Won’t Turn On

You press the power button on your Mac, and nothing happens. There’s no power light, no sound, and a completely black screen. Instead of panicking, try these steps one at a time to diagnose the problem:

Check the power connections to make sure they’re secure on both ends. Next, check the wires for damage and try a different charger or cable.

Check the video-out cable connection with the external display (if any). Also, try raising the monitor brightness to make sure that it’s not turned down extremely low.

There might be a problem with your accessories. Unplug all peripherals except your keyboard and mouse, then try to boot. Plug in your peripherals after a reboot and see if it all works properly.

Perform a power cycle. On a modern MacBook, press the power button and hold it for ten seconds. If your Mac is running, it’ll cut the power and force it to restart. On a desktop Mac, unplug the cable and wait ten seconds. Then plug it in and restart.

Reset the SMC and NVRAM. This is the last step you should try before taking your Mac in for a repair.

See our dedicated guide to get your Mac booting again if you still have trouble.

2. Mac Stalls During Startup

Once you power on your Mac, a sequence of booting events occurs until the login screen or desktop appears. But if the startup process gets stuck, no matter how long you wait, you’ll see only a plain gray screen or one with symbols.

Depending on what you see, follow these instructions.

Plain Gray Screen

If you have a simple gray screen when you boot, here’s what to do:

Faulty peripherals are the primary cause of gray screen problems. Thus, you should detach all wired accessories, then press and hold the power button to shut down your Mac. Plug in one peripheral after each restart to find the culprit.

Try a Safe mode boot. If your Mac completes the startup process here, restart again in normal mode and verify that your startup drive is working properly.

If the Safe mode boot fails or gets stuck, then reset both NVRAM and SMC settings as mentioned earlier.

RAM with incorrect specifications can also result in a gray screen. Remove any RAM you’ve recently added and restart again.

Restart your Mac in Recovery mode by holding Cmd + R as you boot. Then, repair your startup drive with the disk repair utility.

Gray Screen With No Disk Icon

If the gray screen has a folder with a flashing question mark, then it means your Mac can’t find a valid startup volume. But when it shows a “Do Not Enter” symbol, it means that your macOS installation is corrupted.

To fix this:

Sometimes your Mac forgets the startup volume and momentarily shows a flashing question mark. To solve this problem, go to the Startup Disk pane in System Preferences and re-select your startup volume.

Boot your Mac in Recovery mode. In the Apple menu, check whether you can see the startup volume or not. If you can’t, the startup disk most likely has problems. Run the disk repair utility to fix the problem.

Reinstall macOS on your startup disk.

3. Repeated Kernel Panics

image

Occasionally, you may find that your Mac restarts spontaneously. When the screen comes back on, you’ll see a warning message, as shown above. This is known as a kernel panic—a type of low-level, system-wide crash that your macOS can’t recover from. It’s a bit like a blue screen of death on Windows.

The presence of this warning sign is what distinguishes kernel panics from app-related crashes and restarts. A single kernel panic is usually not a problem. But when it happens often, something more serious may be afoot. Since kernel panic tends to occur randomly, they’re often difficult to reproduce.

Causes and Solutions for Kernel Panics

Your Mac needs enough storage space to carry out day-to-day activities. A kernel panic could be a sign that you’re running critically low on disk space. See how to free up space on your Mac to regain some.

macOS is picky about the quality of RAM. If your RAM does not match the specifications or is even slightly defective, kernel panics or crashes can happen. Do a detailed Apple Hardware Test or Diagnostics to check your RAM.

Faulty or outdated peripherals can also result in kernel panics. Detach all peripherals except the power adapter, then reboot and check if it’s working properly. One by one, plug your external devices back in after each restart. If you find the problematic hardware, check for driver updates or contact the manufacturer.

Most of the time, macOS system updates include firmware updates. However, if you have an older Mac, you may be able to install firmware updates manually. Check Apple’s support page for EFI and SMC firmware updates, but know that it’s been archived by Apple. Also, check for updates for third-party apps. Bugs in apps may lead to a low-level system crash.

Safe mode can help isolate many issues that result in kernel panics. If your Mac boots in Safe mode, look for third-party libraries and system extensions in the Library folder.

4. Mac’s Fan Runs Excessively

image

Your Mac contains some vital sensors that respond to temperature changes inside your system. These turn on your fan and provide necessary airflow to cool critical components. They’re important because overheating can lead to physical damage.

Sometimes an app requires a great deal of processing power to complete its task. In such cases, your fans will run heavily and make noise. This is perfectly normal, and you shouldn’t worry about it. But when your fan runs constantly even though it isn’t experiencing heavy usage, that’s a red flag.

Here are some places to check when your fans are going crazy:

Your Mac has vents that let fans bring in cold air and expel hot air. Make sure they aren’t blocked. Avoid using your Mac in places like the couch, a pillow, in bed, or on your lap for extended periods of time.

Dust can accumulate on the vents, fan, and the surface of any parts. When dust blocks the airflow, the heat that does escape has nowhere to go. Periodic cleaning with a cloth or compressed air will help remove this dust.

A faulty temperature sensor, or an erroneous System Management Controller (SMC) setting, could cause your Mac to run the fan all the time. Reset your SMC using the guide linked earlier to fix the problem.

An app might be consuming too much CPU. Open Activity Monitor and visit the CPU tab. Check for any updates for apps using too much CPU, or report the issue to the developer.

5. Mac Keeps Turning Itself Off

You’re working on your Mac, and then it suddenly turns off for no obvious reason. MacBooks can randomly power off despite having an internal battery. This unpredictable issue results in the loss of unsaved work. Worse, it might damage your hardware and macOS.

When your Mac shuts off randomly, here’s what to do:

Check to make sure that the power cord is firmly seated on both ends. Next, review the cables for any damage. Try a spare cable if you have any doubts. And if you’re using a UPS, make sure that it’s working properly and you can power your Mac from the battery.

Go to Energy Saver settings in System Preferences and click the Schedule button to verify that your Mac is not scheduled to shut down automatically.

The SMC chip is responsible for power management and thermal fan controls. When it goes haywire, the fan starts running fast in response to heat and shuts down your Mac. Thus, this is another issue that resetting the SMC in your Mac can fix.

If your fan is not working, then your Mac can shut down due to overheating. To check the health of your Mac’s fan, try apps like Macs Fan Control and TG Pro.

Start your Mac in Safe mode and run it for a while to see if the problem happens there.

Regular Mac Backups Keep Data Safe From Trouble

Macs can have problems just like other computers. Defective components, the age of your Mac, and user-based errors can cause a variety of issues. You’ll notice from the tips here that there’s not a single clearly defined solution for these problems. As a result, these warning signs require thought and care.

That’s where the importance of backups comes in. When you back up your data regularly, you won’t lose your important information if your Mac suddenly stops working. See our guide to backing up your Mac with Time Machine to protect your files.

Welcom to batteriestore.co.uk!We are a manufacturer representative and wholesaler that specializes in Laptop Batteries and Laptop AC Adapters . We have tested Batteries from virtually every manufacturer on the market. Our commitment is to provide our customers with the price/performance available on the market.

Please read the product details carefully to ensure that the brand, model and compatibility of the laptop battery you purchased meets your needs. If you need help, please contact us. Email: info@batteriestore.co.uk.

5 Spooky Ways to Set Up Your Smart Home for Halloween

Smart home technology can make your daily living just a bit easier any time of the year. But during the Halloween season, all of the powerful devices can serve another purpose: to help get everyone in your house in the spirit of the spooky season.

With just a little bit of planning and some easy-to-use smart home devices, you can turn any ordinary trick-or-treat season into a scary good time.

To help get you started, we’re providing five different ways that technology can help turn your Halloween up to 11. Since each home is different, feel free to make each idea your own.

1. Ominous Jack-o-Lantern

image

The jack-o-lantern is one of the universal signs of the Halloween season. After going through the messy and fun carving process and picking your design, everyone wants to show off their spooky gourd on the front porch or other location, usually with a lit candle inside.

But along with the substantial fire hazard, an open candle can often make a huge mess. It also might have problems staying lit in windy weather. So to help a pumpkin masterpiece shine bright anytime you’d like, all you need is a Philips Hue Go smart light. Part of the popular Hue line of connected lightning, the Hue Go is small, compact and can easily fit in a larger gourd. If this is your first Hue product, you’ll need to also purchase the separate Hue bridge that attaches to a router.

With that, you can control the Hue Go using the companion iOS or Android app, Amazon Alexa, Apple’s HomeKit, or Google Assistant. So you can turn on your jack-o-lantern from virtually anywhere.

While the light does come with a power cord, it also features a built-in battery that can go for up to three hours of use. And best of all, you can pick from one of the millions of different colors or any shade of white you can imagine. You’ll have the old-fashioned candle running scared this Halloween.

2. Turn the Spooky Music Up

image

Ah, the sounds of the Halloween season. For some, that means old favorites like “Monster Mash.” And for others, it could mean more adult fare and downright horrifying tunes.

If you’re looking to pipe music to the front porch for trick-or-treaters or a Halloween party inside, the Sonos Play:1 speaker definitely fits the bill. While the speaker might look small, it packs a huge punch and is one the best sounding speakers out there with a reasonable price tag. Along with being easily wall mountable, the speaker is perfect for any smaller space. You can even pair two together to create stereo sound.

Thanks to a recent integration with Amazon Alexa, you can now control music using any Echo device, including the inexpensive Echo Dot. So even if your Dot is on the other side of the house, you can start up music on the Play:1 from a number of different service with just a voice request.

3. Scary Smoke Signal

image

Another fun idea for your porch — or maybe even inside if you are brave — is a smoke machine that will provide a scary ambiance for a more frightening Halloween. With a usual smoke machine, you first fill it with special fog juice and then control it with a wired remote from just a few feet away. Not exactly spooky. But some great smart home technology can help, especially if you’re using an iPhone or iPad.

First, you’ll need to plug your smoke machine of choice into the iDevices Outdoor Switch. As you can probably guess by its name, the rugged switch with two outlets is made for the outdoors and is completely watertight.

The next piece of the puzzle is the Elgato Eve Motion Detector. Safe for outdoor use, you can place it near the smoke machine. Using the Home app (built-in to iOS 11), you’ll need to create a specific automation that will turn on the outlet whenever motion is detected. Once that’s complete, any time a trick-or-treater comes to your door, they’ll experience a spooky show of non-toxic smoke.

4. Keep a Watch for Ghosts and Goblins

image

Hopefully, most everyone on Halloween night ringing your doorbell will be harmless children looking for a piece of sweet candy to add to their collection. But unfortunately, there may also be tricksters up to no good on fright night. Either way, you can keep track of who is at your front door with a doorbell camera. One great option is from August.

Replacing an existing doorbell that requires power, the camera will allow you to look in on your front door at any time. When someone rings the bell, you’ll receive a notification on your iOS or Android device with the companion app. You can then see and speak to the person, even when not at home.

If a goblin, or an annoying teenager, is up to no good and doesn’t ring your doorbell, the device has built-in motion detection that can also provide an alert. With an optional cloud recording service, you can even replay video of motion detection or doorbell alerts later.

While you’ll need to do a bit of installation, the doorbell camera is weatherproof and can also integrate with other smart home products from August including a smart lock. So the system can keep watch and protect your home and family on Halloween and every other night of the year.

5. Paint Your Home With the Colors of the Season

image

There are two major types of landscape lightning: solar lights (often underpowered and don’t perform) and low-voltage lights (require a substantial amount work and time to install). But a fun alternative, perfect for Halloween or any other time, is the SYLVANIA Smart+ LED Landscape Lighting Set.

Offering nine low power LED lights on a 14-foot string, each light has its own small and removable mounting stake. Once you plug the string into an electrical outlet, it can be used pretty much anywhere around the exterior of a home. Thanks to the Lightify app for iOS or Android, you can select from thousands of different colors for the lights to display — everything from a spooky orange to a Christmas green.

Users can also dim or brighten the lights easily from their smartphone. If you want to extend your exterior lighting, you can even purchase another set of lights to attach together.

The lights are compatible with a number of different smart home hubs and services including Amazon Alexa, Wink, SmartThings, Nest, and more.

Have a Spooky Halloween

Thanks to smart home technology, and a little ingenuity, you can take Halloween fun to the next level.

Are you using smart home devices to help make your Halloween even more fun? Tell us your spooky setup in the comments.

Welcom to batteriestore.co.uk!We are a manufacturer representative and wholesaler that specializes in Laptop Batteries and Laptop AC Adapters . We have tested Batteries from virtually every manufacturer on the market. Our commitment is to provide our customers with the price/performance available on the market.

Please read the product details carefully to ensure that the brand, model and compatibility of the laptop battery you purchased meets your needs. If you need help, please contact us. Email: info@batteriestore.co.uk.

6 Ways to Get Your Computer Ready for Halloween

It’s nearly time for Halloween, the spookiest time of year where we dress up, carve pumpkins, and scare each other. Don’t leave your computer out of the fun—there’s loads of ways you can customize your Windows 10 computer for Halloween.

Whether it’s changing your wallpaper, applying sounds, or altering your cursor, we’ve got you covered to make sure you’ll have the ghastliest computer around. Be sure to share your own Windows 10 Halloween tips in the comments afterwards!

1. Change Your Wallpaper

image

How to change your background in Windows 10

Press Windows key + I to open Settings and go to Personalization > Background.

Use the Background dropdown to select Picture. Click Browse to navigate to a saved image and double click it to set it. Use the Choose a fit dropdown to adjust the dimensions, if necessary.

You can also select Slideshow on the first dropdown to cycle between a selection of images. Click Browse and double click a folder to use the images within. The Change picture every dropdown and Shuffle options give you more control over this.

If you want to change the image on your lock screen, use the left-hand menu to click Lock screen. Here you can use the Background dropdown to set it to Picture and customize the image as you did above.

To get some great Halloween wallpapers, check out websites like Wallpaper Abyss, Wallpaper Stock, and HD Wallpapers. For even more, see our selection of creepy Halloween wallpaper images.

2. Set a Theme With Halloween Colors

image

A quick way to get into that Halloween spirit is by changing the color scheme of your computer. To begin, press Windows key + I to open settings and go to Personalization > Colors.

How to change your color scheme in Windows 10

One option is to tick Automatically pick an accent color from my background. This is a nice idea if you have your wallpaper on a rotation, since it’ll constantly keep the color fresh.

Alternatively, beneath Windows colors, click the color you want. Perhaps opt for a pumpkin orange, a blood red, or a monstrous green. If none of the default choices suit, click Custom color to get specific.

How to change your accent color in Windows 10

Scroll down and you can choose to apply the color to Start, taskbar and action centre and Title bars.

To take it a step further, switch your default app mode to Dark to change the color of modern Windows apps. This doesn’t change everything, like your browser or File Manager, but Microsoft are working on this for future updates.

3. Apply a Halloween Screensaver

image

Screensavers might seem like something from the past, but they’re still a fun way to add some Halloween horror to your computer when you’re not using it.

A good source of mostly free Halloween screensavers can be found at Screensavers Planet. Download from their site, run the EXE, and go through the quick installation wizard.

You’ll be taken to the Windows screensaver settings window. You can access this at any time by pressing Windows key + I to open Settings and going to Personalization > Lock screen > Screen saver settings.

Here you can set the Wait time, which is how much inactivity must pass before the screensaver displays. Click Settings… to adjust specifics of the screensaver and Preview to test it out.

4. Set Some Spooky Sounds

image

You can use WAV files to change the sounds your system makes for certain actions, like shut down or errors. A good source of free Halloween sounds is Sound Bible.

Download the sounds you want, then press Windows key + I to open Settings and go to Ease of Access > Audio > Other sound settings.

How to edit your sound scheme settings in Windows 10

Select the Program Event you want to change the sound for. Click Browse…, navigate to the Halloween sound on your computer, and double click it.

Once you’ve changed all the events you want to, click Save As… beneath Sound Scheme. Enter a name and click OK. This will save the theme so that you can switch between it and the Windows defaults with ease.

5. Kick It Up With Halloween Icons

image

Icons appear all over Windows 10, representing programs, drives, folders, and more. Here we’ll look at changing the desktop icons, but see our guide on how to customize any icon in Windows if you want to take it further.

How to Customize Any Icon in Windows 10

To get started, you of course need some suitable Halloween images in the ICO format. Happily, Find Icons has you sorted with a great selection. Download the ones you want.

How to change an icon in Windows 10

Right click an icon on your desktop and click Properties. You should be on the Shortcut tab. Click Change Icon… and then Browse…. Navigate to where the ICO file is and double click it to select it. Click OK to save your changes.

6. Change to a Halloween Cursor

image

Let’s get rid of that boring white cursor and turn it into something more appropriate for Halloween.

You need CUR (static) or ANI (animated) files to adjust your cursor. RW Designer and Cursors 4U both offer a great selection of free Halloween cursors. Download the ones you want from their websites.

Press Windows key + I to open Settings. Go to Devices > Mouse > Additional mouse options. Switch to the Pointers tab.

How to change your cursor in Windows 10

This lists all the different cursors that your system uses, like Normal Select or Busy. Click the one you want to change and click Browse… to navigate to your downloaded cursor. Double click it to select it.

Once you’ve applied all your changes, click Save As… beneath Scheme. Enter a name and click OK. This will let you use the Scheme dropdown to switch between your new Halloween cursor set and the Windows defaults.

Read our guide for customizing your mouse in Windows 10 for more tips.

Trick Or Treat? Even More Halloween Effects

Hopefully now your Windows computer has the full Halloween makeover, with pumpkins, witches, and ghouls abound. Be careful not to scare yourself when you log in after going trick or treating.

If you want to go one step further with your customizations, check out our guide for applying spooky Halloween effects with Rainmeter.

Welcom to batteriestore.co.uk!We are a manufacturer representative and wholesaler that specializes in Laptop Batteries and Laptop AC Adapters . We have tested Batteries from virtually every manufacturer on the market. Our commitment is to provide our customers with the price/performance available on the market.

Please read the product details carefully to ensure that the brand, model and compatibility of the laptop battery you purchased meets your needs. If you need help, please contact us. Email: info@batteriestore.co.uk.

How to Install Windows 10 From a Bootable USB Drive

Need to install a fresh copy of Windows?

Booting Windows 10 (and Windows 7) from a USB stick is straightforward. Within minutes you can have a fresh new version of Windows installed on your PC, laptop, or media center.

Here’s everything you need to know about installing a fresh copy of Windows 10 from a bootable USB stick.

Why Boot a Windows Installation From USB?

If your spare PC doesn’t have an optical drive, or you’re out of DVDs, a bootable USB stick is the best solution.

After all, a USB stick is portable, and you can guarantee it is compatible with every desktop and laptop computer. While some computers might be missing a DVD drive, they all have a USB port.

It’s also quicker to install from USB. A USB drive can be made bootable faster than an optical drive can; it also installs the operating system quicker.

To install Windows 7 or Windows 10 from a USB stick, you need a device with at least 8GB of storage. Before proceeding, ensure that your USB flash drive has been formatted.

Ensuring USB Stick Has UEFI Boot Support

Before you download a bootable Windows installation image, it’s important to know the difference between UEFI and BIOS.

Older PCs rely on the basic input/output system (BIOS) to boot the operating system and manage data between the operating system and devices. For the past decade, UEFI (Unified Extensible Firmware Interface) has replaced BIOS, adding legacy support. UEFI can assist with PC diagnosis and repair without additional software or media.

Fortunately, the most common methods of installing Windows 10 from a bootable USB drive support UEFI and legacy BIOS hardware. So, whichever option you choose should work for your hardware.

Preparing the Windows 10 Bootable USB

Before proceeding, insert your formatted USB flash stick in your PC or laptop.

Ready to install Windows 10? While several methods exist, the easiest way to do this is to use the Windows 10 Media Creation Tool.

To grab this, head to the Microsoft Download Windows 10 page and click Download tool now.

image

Save the tool to your computer. It’s around 20MB in size, so shouldn’t take too long on a fast connection. Once downloaded, launch the media creation tool and click Accept when prompted.

You’ll be presented with two options. Select Create installation media (USB flash drive, DVD, or ISO file) for another PC and click Next.

image

Set your preferred Language, Windows 10 Edition, and system Architecture. Note that if these settings cannot be changed, you should clear the checkbox labeled Use the recommended options for this PC. Hit Next again.

image

Choose USB flash drive, then Next, and select the USB drive from the list. Click Next once more to prompt the downloading of your Windows 10 installation files.

image

Wait while the bootable USB Windows 10 installer is created. How long this takes will depend on your internet speed. Several gigabytes of data will be installed, so if you don’t have access to a fast internet connection at home, consider a library or even your place of work.

Installing Windows 10 With a Bootable USB Drive

With the installation media created, you’ll be able to install Windows 10. The USB drive is now bootable, so all you need to do is safely remove it from your PC, then insert it into the target device.

Power up the computer you’re installing Windows 10 on and wait for it to detect the USB drive. If this doesn’t happen, reboot, this time pressing the key to access the UEFI/BIOS or boot menu. Ensure the USB device is detected, then select it as the main boot device.

The subsequent reboot should detect the Windows 10 installation media. You’re now ready to install Windows 10! Get started by starting the installation wizard.

Once you’ve worked through the wizard, Windows 10 will be installed. Note that some installation may continue after you log in, so be patient. It’s also worth checking for Windows Updates (Settings > Updates & Security > Windows Update) after installation to ensure everything is up to date.

How to Install Windows 7 From a Bootable USB Drive

What if you’ve had enough of Windows 10? If you own a valid license for Windows 7, you can also install this from a bootable USB drive.

The process is largely similar, although for older PCs you won’t need to worry about UEFI support. Windows 7 is a great option for newer PCs in terms of being comparatively lightweight. However, support for the operating system ends in January 2020. As such, you should ensure that you upgrade to a more secure operating system when the times comes.

See our full guide to installing Windows 7 from a bootable USB drive for details.

Keep Your Bootable Windows Installation USB Drive Safe

Making a bootable Windows USB drive is simple:

Format an 8GB (or higher) USB flash device

Download the Windows 10 media creation tool from Microsoft

Run the media creation wizard to download the Windows 10 installation files

Create the installation media

Eject the USB flash device

While you should expect largely trouble-free computing from Windows 10, it’s a good idea to keep the USB boot drive safe. After all, you never know when a hard disk drive can crash, or a partition table will corrupt.

The Windows boot drive features various repair tools that can be used if Windows 10 will not boot. Store the boot drive in a memorable place where it can be easily retrieved for troubleshooting or reinstalling Windows later.

While you’re considering using USB devices for system recovery, why not create a PC repair toolkit on a USB stick?

Welcom to batteriestore.co.uk!We are a manufacturer representative and wholesaler that specializes in Laptop Batteries and Laptop AC Adapters . We have tested Batteries from virtually every manufacturer on the market. Our commitment is to provide our customers with the price/performance available on the market.

Please read the product details carefully to ensure that the brand, model and compatibility of the laptop battery you purchased meets your needs. If you need help, please contact us. Email: info@batteriestore.co.uk.

How to Move Installed Apps & Programs in Windows 10

If you’ve got a lot of apps and programs installed on your Windows 10 system, you might want to move them to another drive to free up space. It may also be necessary to change your default install location. Happily, all of these things are possible.

Windows has a built-in utility that allows you to move modern apps to a location of your choice. Although this method doesn’t work for traditional desktop programs, it’s still possible to move these programs to another drive.

Let us show you how to move an app or program to another drive.

How to Move Apps & Programs to Another Drive

It’s quick to move most of the native Windows apps, but the process of moving anything else will require additional work. First, we’ll outline the process for Microsoft Store apps, then we will take a look at traditional desktop programs.

Modern Apps

Press Windows key + I to bring up the Settings menu and click Apps. You should be on the Apps & features page of the left-hand navigation.

Here you will find a list of all apps and programs installed on your system. Some of these apps might have come with your system, the others you installed yourself. This method will only work with the latter group.

Scroll to the app that you want to move and select it from the list. Now, click Move. Select the new drive location from the dropdown, then click Move again.

You can repeat the process if you ever want to move the app back or to a different drive.

If the Move button is greyed out, it means it’s a Windows 10 app that can’t be moved. If you see a Modify button instead, it’s a traditional desktop program and you’ll need to follow the method outlined below.

Desktop Programs

Microsoft doesn’t recommend moving the file location of installed programs because it can cause issues, like the program ceasing to run. A safer (though less efficient) method is to uninstall the program and then just reinstall it to your desired drive.

If you do want to proceed, create a restore point so you can reverse the changes, if anything goes wrong.

We recommend using a program called Steam Mover. This was originally designed to move Steam games between drives, but will actually work on any program. You can use it to move programs from your HDD to SSD, for example.

Note that any drive you want to use with this program, whether it’s where the installed program currently sits or where you want it moved to, needs to be in the NTFS format. You can check this by loading File Explorer and then clicking This PC from the left-hand navigation. Now, right-click a drive and select Properties. Refer to the File system to see if it’s using NTFS.

image

Open Steam Mover. First, select the … button next to Steam Apps Common Folder to select the folder path which contains the program you want to move (for example, your Program Files). Now, select the … button next to Alternative Folder and select the folder path where you want to move the program to.

image

Next, select the program from the list that you want to move. You can select multiple programs by holding CTRL as you click. When ready to move, click the blue right arrow at the bottom to begin. Command Prompt will open and process the move. When complete, you’ll see the new folder path next to the program in the Junction Point column.

How to Change the Default Install Location

If you just want to change the default install location for apps, that’s simple. Changing it for standard programs is a bit more complicated.

Modern Apps

Press the Windows key + I to bring up the Settings menu. From here, click System and then select Storage from the left-hand menu.

Underneath the More storage settings heading, click Change where new content is saved. To change the default drive for new apps, use the New apps will save to: dropdown.

image

app save locations

You will notice that this page also allows you to change the default location of things like documents, music, and pictures.

Desktop Programs

Microsoft doesn’t recommend changing the default install path for programs. Doing so could cause problems with existing programs and some Windows features. It’s best to perform this operation on a clean system. If that’s not suitable, create a restore point so that you can roll back if necessary.

The majority of programs will let you change the install path when installing them, which might be a better solution than fiddling with the system.

image

If you do want to proceed, we recommend a program called Install Dir Changer. Download it from SourceForge and then run the program.

Once the program has opened, click Enable Editing and then click Yes when the User Account Control window pops up. You’ll now be able to select a default install path, using the … button to browse to a folder path if necessary.

image

install dir changer

Program Files is where 64-bit applications will be installed and Program Files (x86) is for 32-bit applications. If you’re not sure what that means, read our guide for the difference between the 32- and 64-bit versions of Windows. But you’ll probably want both of them on the same drive anyway.

Once you’ve selected your new path, click Apply Changes. Now all new programs you install will default to these folder paths.

Clean Up Your Drive

Now that you know how to move your apps and programs and how to change their default install location, you can free up space on your drives. But remember to take all precautions when using the third-party programs.

And if you want to salvage even more disk space, consider deleting old Windows files and folders. Along with having moved your programs to another drive, you’ll have a superbly organized drive.

Welcom to batteriestore.co.uk!We are a manufacturer representative and wholesaler that specializes in Laptop Batteries and Laptop AC Adapters . We have tested Batteries from virtually every manufacturer on the market. Our commitment is to provide our customers with the price/performance available on the market.

Please read the product details carefully to ensure that the brand, model and compatibility of the laptop battery you purchased meets your needs. If you need help, please contact us. Email: info@batteriestore.co.uk.

How to Make Sure Your Computer Can Run Windows 10

Is your old PC getting you down? Concerned about the lack of updates for your older version of Windows?

While you might be persisting with Windows 7 or 8, there’s a good chance your computer can run Windows 10. Here’s how to check if your computer is up to running Windows and what to do next.

Why You Need to Upgrade to Windows 10

While you might have been happily using Windows 7, Windows 8, maybe even Vista or XP, you should have noticed the problem. Updates have come to an end. Without updates, operating systems lose out on security patches.

So although the operating system appears to work, vulnerabilities can be exploited. Security software can pick up malicious software, but this a reactive measure. Antivirus tools cannot fix issues with the OS. Only the OS developer can do that.

Upgrading to Windows 10 means using an operating system that is updated monthly. Security updates protect your online activity and the personal data stored on your system. It’s a smart approach that has worked well for Microsoft.

As of September 2019, Windows 10 holds 60.65 percent share of the Windows operating system market. Windows 7 is second with 29.39 percent. But to put it simply, you need to upgrade to Windows 10.

Can Old Computers Run Windows 10?

It’s a good question. Windows 10 was released with such low system requirements that in theory, many older computers, from around the Windows Vista era (2007) and later, should be compatible.

In practice, however, this is often not the case. Instead, computers released with Windows 7 are a better option. The system requirements are almost identical to Windows 10, making the later OS an ideal upgrade.

The Windows 10 System Requirements

It’s a good idea to see if your current computer hardware can run Windows 10. Start off by reviewing the minimum system requirements for Windows 10.

The System Requirements for running Windows 10 as confirmed by Microsoft’s specification page are:

Processor: 1 gigahertz (GHz) or faster processor or SoC

RAM: 1 gigabyte (GB) for 32-bit or 2GB for 64-bit

Hard disk space: 16GB for 32-bit OS 20GB for 64-bit OS

Graphics card: DirectX 9 or later with WDDM 1.0 driver

Display: 800×600

If your hardware matches or surpasses these values, you should be able to run Windows 10.

How to Check If Your Computer Will Run Windows 10

The easiest way to see if your computer is compatible with Windows 10 is to run the later operating system in a virtual machine. Our guide to using VirtualBox will show you how to install an operating system like Windows 10 on your computer.

Check Windows 10 compatibility in VirtualBox

Too complicated? No problem. To find out the current hardware of your Windows 7 or 8 PC, click Start then type sys. In the displayed results, click System Information and use this to compare with the minimum system requirements above.

One stumbling block may be the hard disk drive (HDD). While the requirements are the same, upgrading to a larger, faster HDD will improve performance on Windows 10 considerably. Older HDDs rarely perform well with a new operating system, so consider a replacement hard disk drive before upgrading.

Can My Computer Run Windows 10 64-Bit?

Older computers are unlikely to be able to run any 64-bit operating system. While some pre-2007 models have 64-bit hardware, most are 32-bit. As such, computers from this time that you plan to install Windows 10 on will be limited to the 32-bit version.

If your computer is 64-bit, then it can probably run Windows 10 64-bit. However, it will need to meet the system requirements, as listed above.

Confused? Don’t worry—here’s the difference between 32-bit and 64-bit Windows.

What’s the difference between 32-bit and 64-bit Windows? Here’s a simple explanation and how to check which version you have.

READ MORE

Can’t Run Windows 10? Here Are Your Options

If your computer isn’t suitable for Windows 10, you have three choices to make.

1. Buy a New PC or Laptop

It’s the easiest option, but potentially the most expensive. While Windows 10 computers are available for all price tags, for a daily driver, budget for around $500. Take the time to head to a local computer retailer with machines on display and try one out.

Able to afford more? Check our guide to the best Windows 10 computers.

What is the best Windows laptop for you? Here are the best Windows laptops of 2019 to help you find one that suits your needs.

2. Identify Upgradeable Hardware and Replace

Computers can be upgraded. For desktop users, this means new memory, a new hard disk drive, and potentially a new processor or graphics card can be added. Laptop owners can usually add RAM. We’ve already recommended that you replace your HDD for improved, increased storage.

The question is, can your existing PC take upgraded hardware that will allow you to run Windows 10?

To find out, compare the minimum specs above with the hardware your computer can potentially be upgraded to. This may take a bit of research, however. If you’re inexperienced with PC upgrades, buying a new computer might be smarter.

3. Install a Different Operating System

If your computer cannot run Windows 10 and you’re not buying a new device or upgrading the hardware, what happens? Well, given the importance of an operating system that is regularly updated, it might be time to look elsewhere. Various alternative operating systems are available, mostly in the Linux family, some of which are designed specifically for Windows refugees.

Check our list of the best Linux operating systems to get started. Alternatively, consider ReactOS, a Windows-like operating system.

The best Linux distros are hard to find. Unless you read our list of the best Linux operating systems for gaming, Raspberry Pi, and more.

Ready for Windows 10? Here’s What to Do Next

By now you should know the truth. Either your computer can run Windows 10, or it can’t. If your PC is compatible with the operating system, it’s time to try Windows 10 out.

Windows 10 will set you back $119 new, but it is possible to try an evaluation version. This 90 day version of Windows 10 Enterprise is available from Microsoft. However, if you opt to buy Windows 10, this won’t be the version you use. It’s worth checking out if you’re interested, however, and don’t plan to buy a new PC.

To install, Windows 10 must be written to USB or a DVD. Microsoft provides a media creation tool to help here.

Install Windows 10 from USB or optical disc

You can also download the consumer version of Windows 10, but this won’t receive any vital updates. It also includes a nag screen till you buy a license.

Welcom to batteriestore.co.uk!We are a manufacturer representative and wholesaler that specializes in Laptop Batteries and Laptop AC Adapters . We have tested Batteries from virtually every manufacturer on the market. Our commitment is to provide our customers with the price/performance available on the market.

Please read the product details carefully to ensure that the brand, model and compatibility of the laptop battery you purchased meets your needs. If you need help, please contact us. Email: info@batteriestore.co.uk.

7 Effective Tools to Increase Your Hard Drive Performance on Windows

Windows has a (deserved) reputation for slowing down your computer over time. Admittedly, Windows 10 is much better than its predecessors, but the problem still occurs.

Thankfully, you can speed up a hard disk using HDD optimization apps; a few different tools are available.

In this article, we’re going to look at which utilities can improve the speed and efficiency of a hard disk. Keep reading to learn more.

1. Windows Optimize Drives

Let’s begin with a mention of a native Windows tool—Optimize Drives. It can analyze your system for defragmentation issues, then fix any problems it finds.

Unless you’d fiddled with the settings, it should already be running on an automatic schedule. To check, head to Start > Windows Administrative Tools > Defragment and Optimize drives.

Highlight the drive you want to fix, then click either Analyze or Optimize, depending on the function you want to carry out. To make sure the scheduling is set up correctly, click on Change settings and tick the box next to Run on schedule.

Performing disk defragmentation is less critical on SSDs than HDDs, but Microsoft still recommends running the tool once per month.

2. Disk SpeedUp

Disk SpeedUp is a third-party tool that can boost an HDD’s speed. It will analyze, defragment, and optimize any drives that are connected to your machine.

It has a few more features than the native Windows tool. For example, Disk SpeedUp can automatically shut down your computer after the defrag process is complete. You could fire it up before you go to bed and come back to a fresh computer in the morning.

Disk SpeedUp also has better visuals than the Windows tool. The defrag map is more intuitive, and there are more graphs and data for you to dig into.

Anecdotally, many users have claimed that Disk SpeedUp is faster than the Windows tool. Naturally, your mileage may vary.

3. Windows Device Manager

If you want to increase a disk’s read/write speed, another Windows tool worth using is Device Manager. You can use it to make sure Write Caching is turned on.

Write caching lets your computer store data in a cache before it is written to the hard drive. Because a computer can write data to a cache much more quickly than to a hard drive, the overall read/write performance of the hard drive is improved.

Remember, however, that data in a cache is only temporary. If your computer suffers from a sudden power loss and the data in the cache has not been transferred to your hard drive, you will lose it.

To turn on write caching on Windows, follow these steps:

Right-click on the Start menu and select Device Manager.

Click on the + next to Disk drives.

Right-click on the drive you want to change.

Click on Properties.

Select the Policies tab at the top of the new window.

Mark the checkbox next to Enable write caching on the device.

4. IOBit Advanced SystemCare

An important aspect of giving your HDD a boost is to make sure your system stays “clean.” That means you need to stay on top of temporary and duplicate files, make sure your RAM and CPU usage is optimized, and keep your registry as tidy as possible.

One tool that can perform all those HDD optimization tasks is IOBit Advanced SystemCare. A free version and a paid version both exist. The free version includes all the features we just mentioned. The $20 paid version adds deeper registry cleaning, real-time monitoring, browser optimization, and system boot optimization.

Download: IOBit Advanced SystemCare (Free, paid version available)

5. Razer Cortex

If you’re wondering how to speed up a hard disk even further, check out Razer Cortex. The tool is specifically designed for PC gamers who want to squeeze every drop of juice out of their systems. It can help you achieve higher frames per second and reduce game loading times.

The HDD optimizer is split into two parts—System Booster and Game Booster. They combine to give an HDD boost to all users.

The system part of the tool will clean junk files, your browser history, and your system cache. The gaming part will defragment game files (as long as they on an HDD rather than an SSD), optimize your system’s configuration for gaming, and disable background processes that can impact a game’s performance.

Download: Razer Cortex (Free)

6. Windows Disk Management

The last native Windows utility that can improve the speed and efficiency of a hard disk is Disk Management. You can use it to repartition your drives.

Using a greater number of partitions is one of the most oft-overlooked ways to speed up a hard drive. Broadly speaking, the more partitions you use, the more organized your data is. As a result, an HDD’s head does not need to move as far to access the data and read times are reduced.

To repartition a hard drive using Disk Management, follow the steps below:

Right-click on the Start menu.

Select Disk Management to open the tool.

Right-click on a drive and select Shrink Volume.

Right-click on the freed-up space and choose New Simple Volume.

Choose how large you want to make the new volume.

Select the drive letter for the new volume.

Choose a file system for the new volume.

Click on Finish.

The new volume will appear in File Explorer > This PC.

7. Ashampoo WinOptimizer

The final tool that can give your hard disk a health increase is Ashampoo WinOptimizer. The tool brands itself as a “Swiss army for your PC.” It’s a fair description.

In terms of improving hard drive health, it can schedule maintenance and optimization tasks, scan for junk files, fix broken registry entries, and clean your browser cookies. The tool offers both a one-click fix and user-controlled corrections.

Separately, you can add additional modules to the app. There are 38 to choose from, covering tasks such as service management, start-up tuning, process management, privacy tuning, and much more.

More Tips on How to Speed Up a Hard Drive

The seven tools we’ve explained in this article will go a long way towards speeding up your hard drive. They can give both SSDs and HDDs a boost.

If you’d still like to learn more about how to increase a hard disk’s speed, check out our other articles on quick fixes to make your Windows PC run faster and how to speed up Windows 10.

Welcom to batteriestore.co.uk!We are a manufacturer representative and wholesaler that specializes in Laptop Batteries and Laptop AC Adapters . We have tested Batteries from virtually every manufacturer on the market. Our commitment is to provide our customers with the price/performance available on the market.

Please read the product details carefully to ensure that the brand, model and compatibility of the laptop battery you purchased meets your needs. If you need help, please contact us. Email: info@batteriestore.co.uk.

Genuine AL10G31 Battery For ACER Aspire One AOD255 Series

  • Specifications:
  • Primary OEM Brand: acer
  • Capacity:6600mAh
  • Voltage: 11.1V
  • Chemistry: Li-ion
  • Item Number: EPCE140

✔ Quality replacement battery with high Capacity

✔ Longer lifespan – thanks to modern Lithium technology without memory effect.

✔ Guaranteed safety: Protected against Short-circuits, Overheating and Overvoltage

✔ Each cell is separately tested in order to ensure professional standards are met.

✔ 100% compatible in replacing your original battery

Welcom to batteriestore.co.uk!We are a manufacturer representative and wholesaler that specializes in Laptop Batteries and Laptop AC Adapters . We have tested Batteries from virtually every manufacturer on the market. Our commitment is to provide our customers with the price/performance available on the market.

Please read the product details carefully to ensure that the brand, model and compatibility of the laptop battery you purchased meets your needs. If you need help, please contact us. Email: info@batteriestore.co.uk.

The Foldable Huawei Mate X: Coming to China on November 15th for ~$2074

Foldable smartphones from Huawei and Samsung attracted quite a lot of public attention at Mobile World Congress early this year, but launches were delayed as companies had to polish the technology. Samsung’s Galaxy Fold has since been released into the market in select countries (Ian: my local EE store has sold a dozen or so), whereas the Mate X, its rival from Huawei, is coming later.

As it turns out, Huawei plans to launch its Mate X in China on November 15. The foldable smartphone, which is powered by the HiSilicon Kirin 980 SoC (paired with 8 GB of RAM and 512 GB of storage), the Balong 5000 5G modem, and features an 8-inch foldable display with a 2480×2200 resolution and a 9:8 aspect ratio, will cost ¥16,999. This translates into a ~$2074 price in the US.

It is not completely clear when Huawei’s Mate X is set to arrive to other markets (if at all) and what kind of software will it have pre-installed. Considering how expensive the smartphone is, selling it potentially without applications from Google and other US-based vendors may not be a good idea in non-Chinese markets

In addition to revealing the launch date of the Mate X, Huawei also said today that it plans to release a refined version of the foldable smartphone, the Mate Xs, on the HiSilicon Kirin 990 5G SoC. It has a built-in 5G modem, and is set to come to China in March. It is unknown how much will the unit cost and whether it will be available outside of China.

Welcom to batteriestore.co.uk!We are a manufacturer representative and wholesaler that specializes in Laptop Batteries and Laptop AC Adapters . We have tested Batteries from virtually every manufacturer on the market. Our commitment is to provide our customers with the price/performance available on the market.

Please read the product details carefully to ensure that the brand, model and compatibility of the laptop battery you purchased meets your needs. If you need help, please contact us. Email: info@batteriestore.co.uk.